
LCD는 Liquid Crystal Display의 약자로 액정표시장치를 말합니다. 액정은 액체처럼 유체의 성질을 가지면서 고체처럼 광학적 성질을 가지는 물질을 말합니다. 또한 액정은 고체표면에 특정 방향으로 정렬할 수도 있어, 전기적 신호를 가해 원하는 방향으로 배열하여 빛을 투과시키거나 차단시킬 수 있기 때문에 디스플레이에 사용됩니다. LCD는 손목시계부터 TV에 이르기까지 광범위하게 활용되고 있습니다.
LCD는 얇고 가벼우며 소비전력이 적지만, 어두운 곳에서는 잘 아보이는 단점이 있습니다.
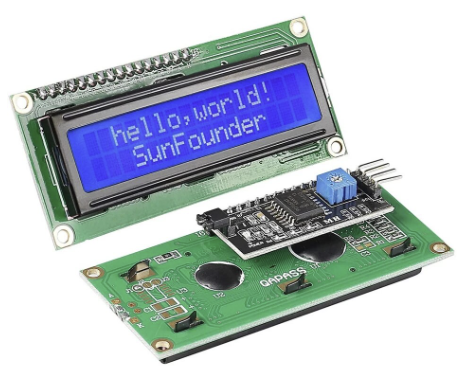
우리는 I2C 방식의 LCD 를 사용합니다.
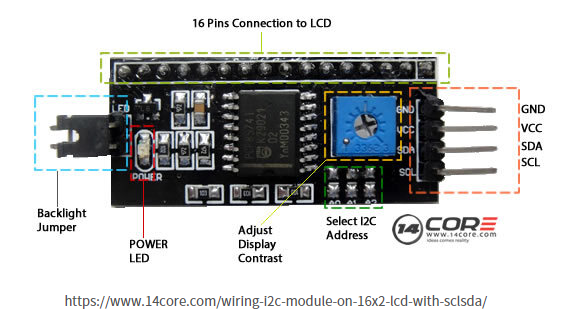
I2C(Inter Integrated Circuit) 는 주변장치를 연결하기 위해 필립스사에서 개발한 직렬버스 통신방식이며, SCL,SDA 두 개의 신호로 통신이 가능합니다. SPI나 Serial 통신에 비해 속도가 느린편이며 I2C버스는 반드시 Pull-up으로 연결해주어야 합니다.
I2C의 통신구조는 기본적으로 Pull-up되어 있으므로 SDA만 Low로 되면 Start가 되고, High가 되면 Stop이 됩니다. Start 이후 클럭이 High일때 데이터 값이 결정되어 전송되며 데이터는 7bit, 즉, 128개 데이터를 보낼 수 있고 나머지 1bit는 다른 용도로 사용됩니다.
준비물
- 아두이노 우노
- 브레드 보드
- 점퍼선
- I2C LCD
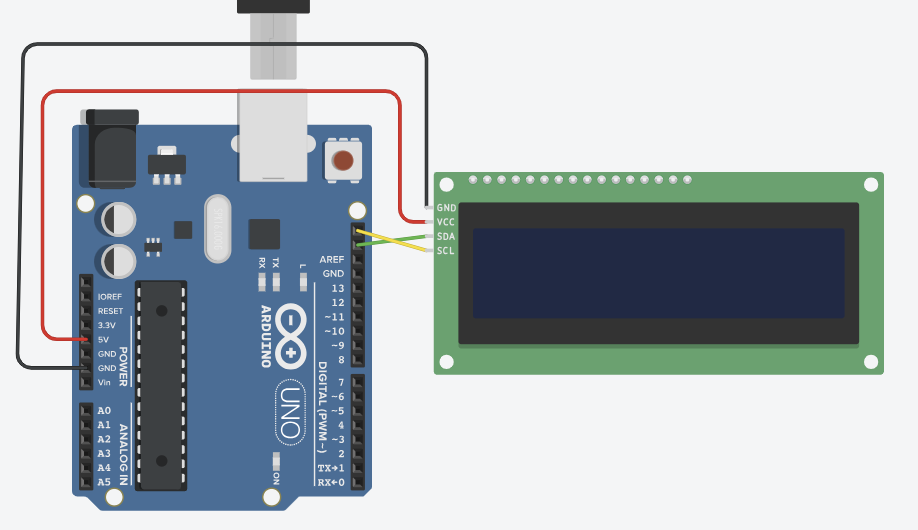
1) LCD 연결하기
회로도
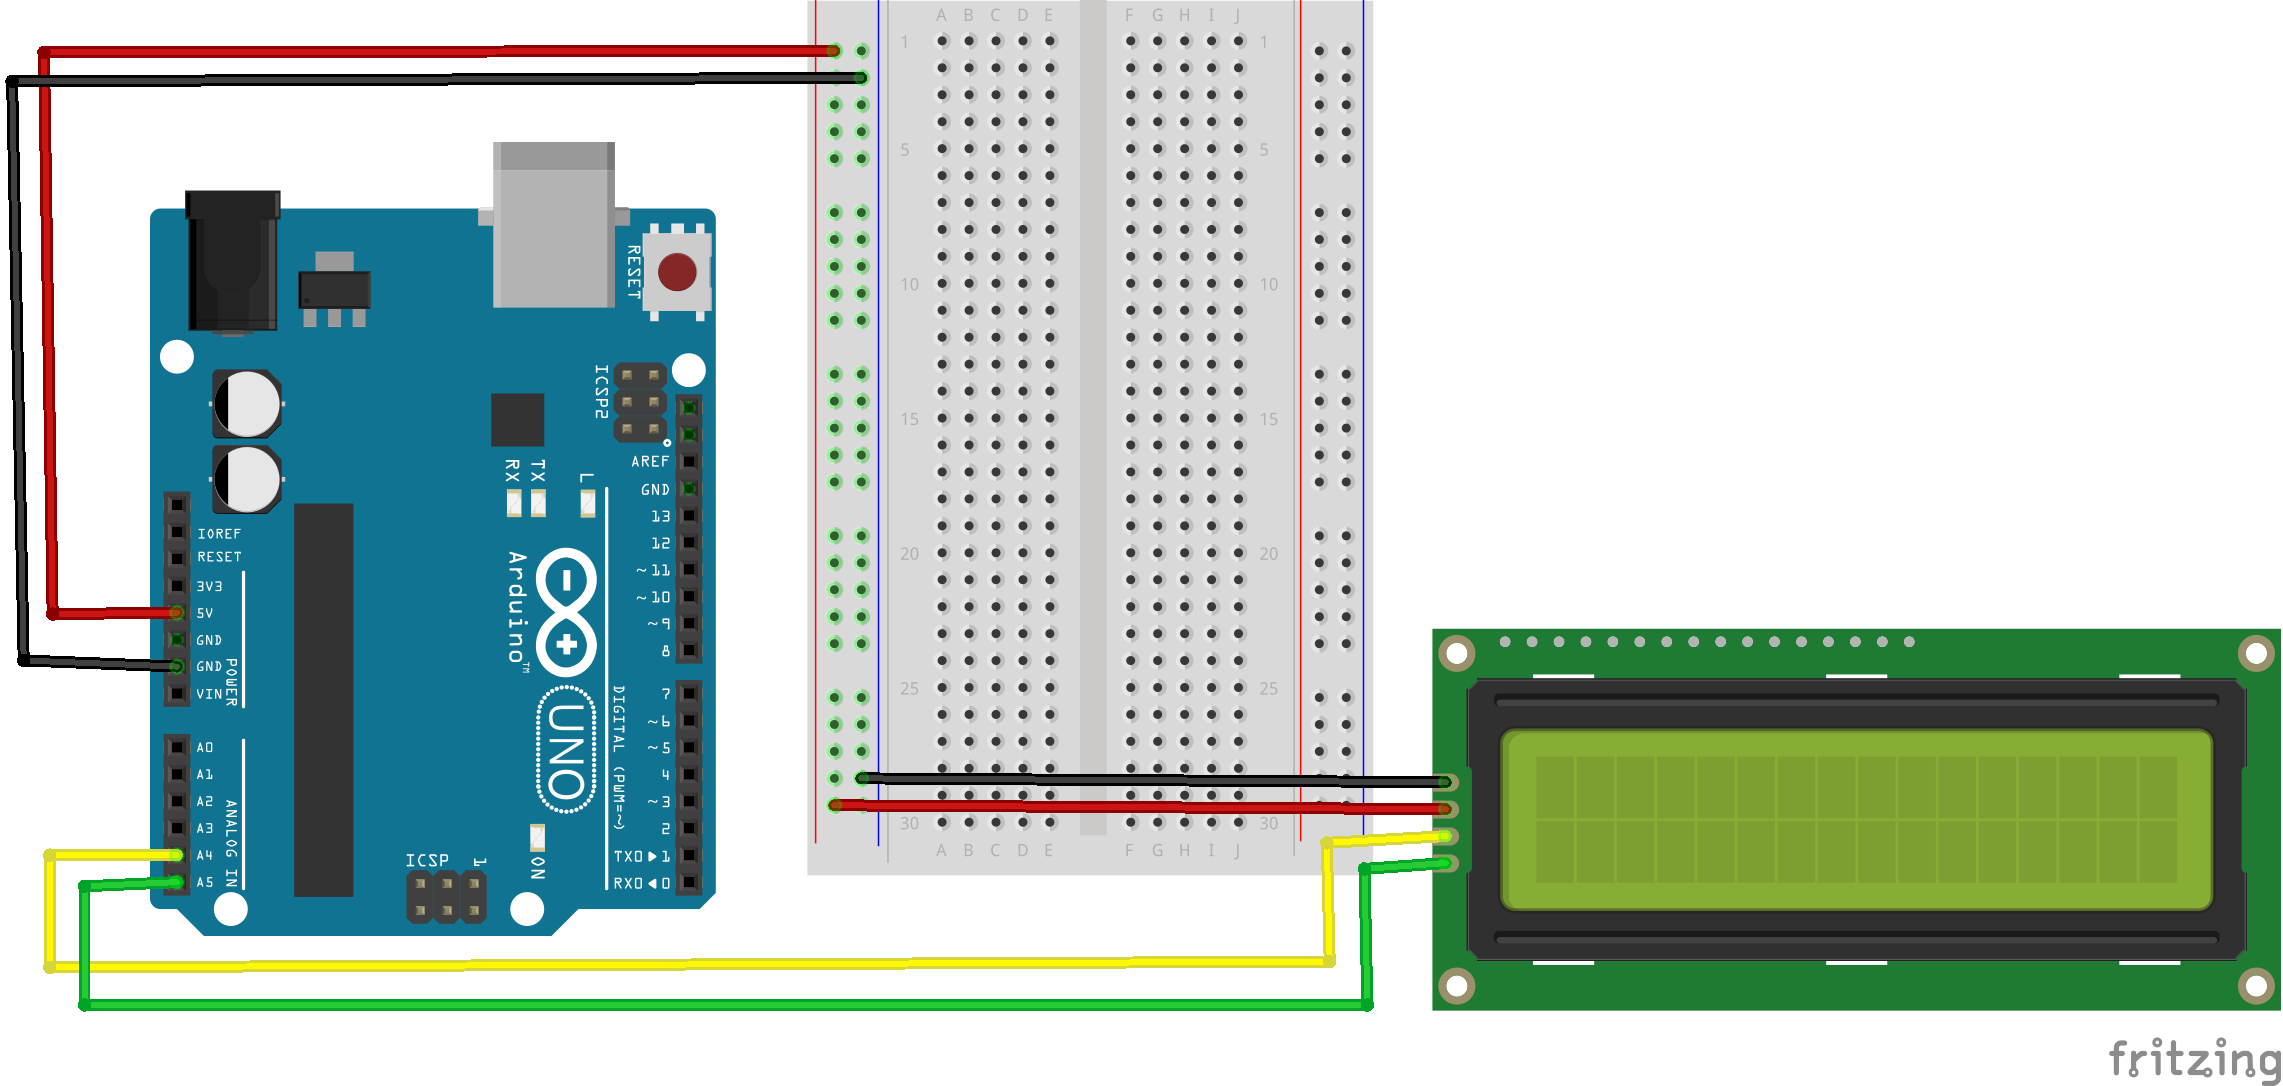

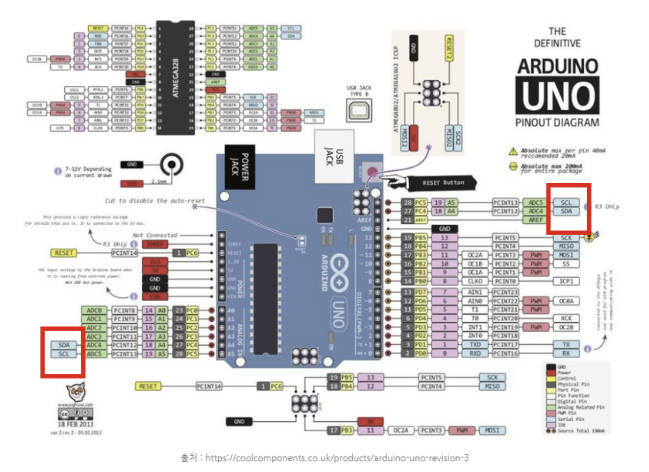
[ 핀맵 참고 ]
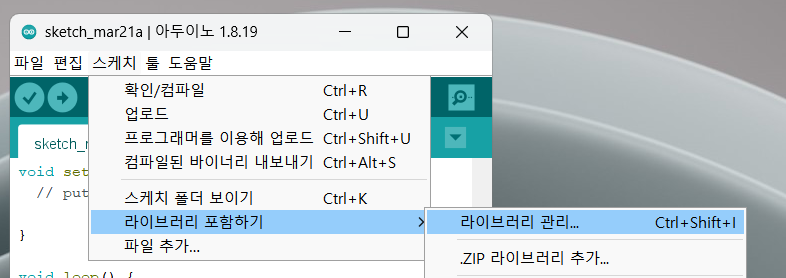
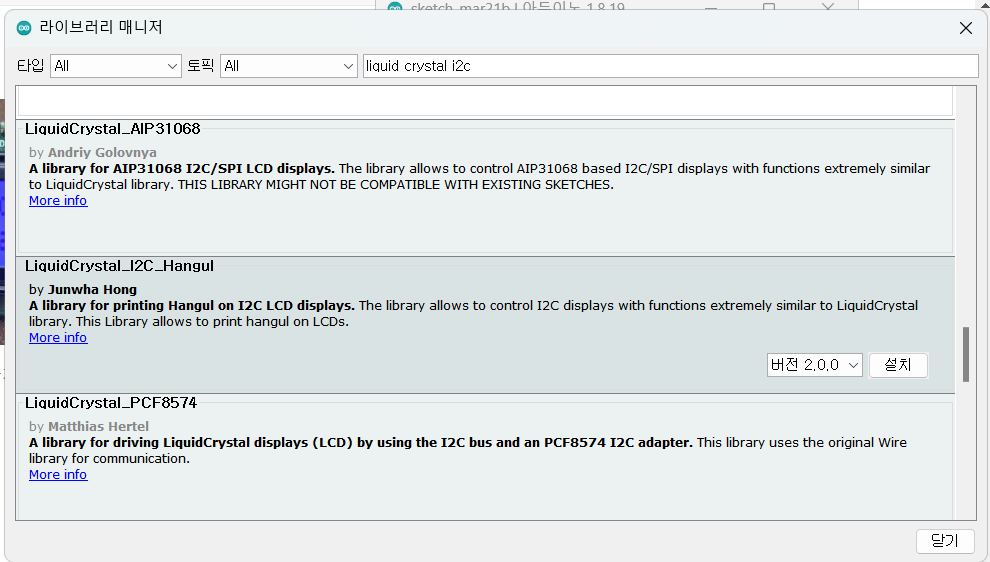
LCD를 사용하기 위해서는 먼저 라이브러리를 설치해야합니다.
(1) 스케치-라이브러리 포함하기-라이브러리 관리
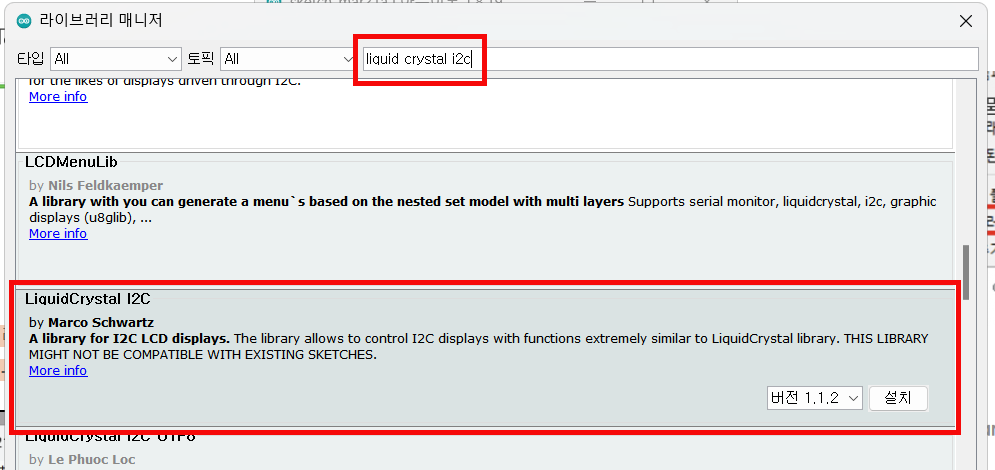
(2) liquid crystal i2c 로 검색한 후 라이브러리를 설치합니다.
소스코드
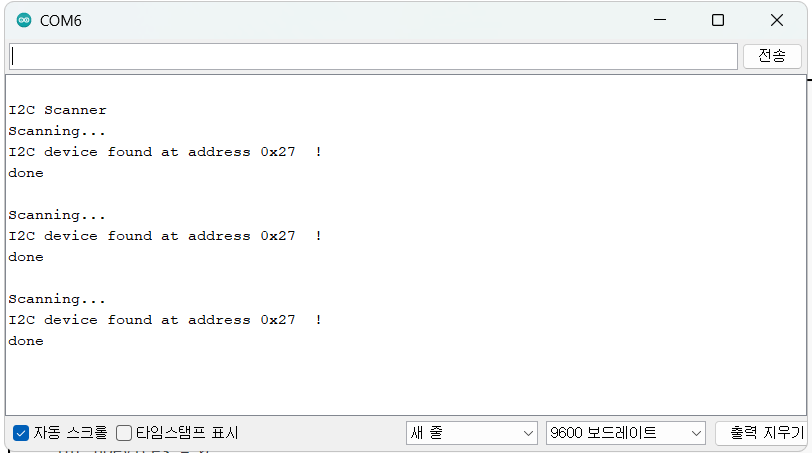
1) LCD 주소 확인하기
#include <Wire.h>

void setup() {
  Wire.begin();

  Serial.begin(9600);
  while (!Serial); // Leonardo: wait for serial monitor
  Serial.println("\nI2C Scanner");
}

void loop() {
  int nDevices = 0;

  Serial.println("Scanning...");

  for (byte address = 1; address < 127; ++address) {
    // The i2c_scanner uses the return value of
    // the Write.endTransmisstion to see if
    // a device did acknowledge to the address.
    Wire.beginTransmission(address);
    byte error = Wire.endTransmission();

    if (error == 0) {
      Serial.print("I2C device found at address 0x");
      if (address < 16) {
        Serial.print("0");
      }
      Serial.print(address, HEX);
      Serial.println("  !");

      ++nDevices;
    } else if (error == 4) {
      Serial.print("Unknown error at address 0x");
      if (address < 16) {
        Serial.print("0");
      }
      Serial.println(address, HEX);
    }
  }
  if (nDevices == 0) {
    Serial.println("No I2C devices found\n");
  } else {
    Serial.println("done\n");
  }
  delay(5000); // Wait 5 seconds for next scan
}
- 결과
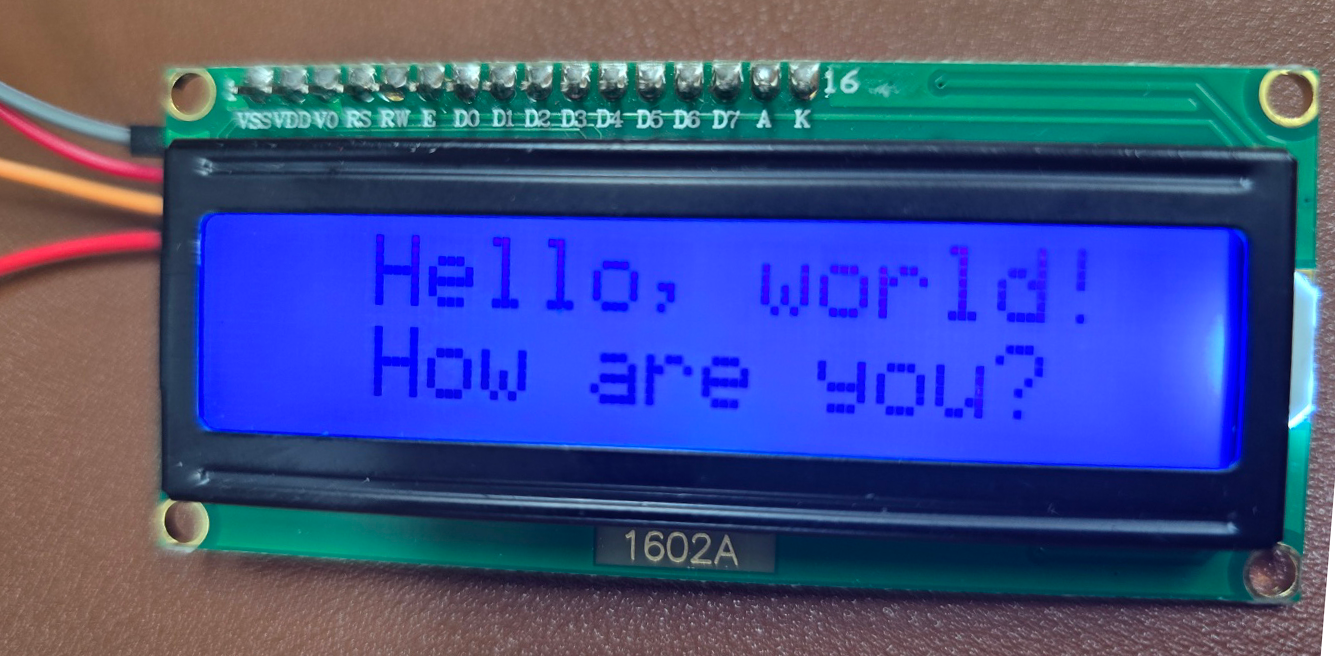
2) LCD에 글자 나타내기
#include <Wire.h>
#include <LiquidCrystal_I2C.h>

LiquidCrystal_I2C lcd(0x27,16, 2);    //lcd주고 확인 후 수정 가능

void setup()
{
  lcd.init();  // LCD초기 설정
  lcd.backlight(); // LCD초기 설정
  lcd.setCursor(0,0);

  //처음 텍스트가 LCD에 나타날 위치  lcd.setCursor(열, 행)
  lcd.setCursor(2,0);
  lcd.print("Hello, world!");
  lcd.setCursor(2,1);
  lcd.print("How are you?");
}

void loop()
{// 아무 동작도 안함
}
- 결과
여기서 한글을 사용하고 싶다면 한글 라이브러리를 설치하면 됩니다.
한글 출력과 관련된 함수
(1) lcd.printHangul(wchar_t* txt, byte startPoint, byte len)
- 첫번째 인자에 한글을 wchar_t 문자열로 입력,
두번째 인자에는 글자가 시작할 위치,
세번째 인자에는 한글 문자열의 길이를 입력해주시면 됩니다.
(2) lcd.setDelayTime(int time)
- 한글 출력 라이브러리는 한글을 앞 글자를 지워가면서 출력을 하는데 출력되는 속도를 조절할 수 있습니다.
단위는 밀리세컨드(millisecond)입니다.
#include <Wire.h>
#include <LiquidCrystal_I2C_Hangul.h>

LiquidCrystal_I2C_Hangul lcd(0x27,16, 2);    //lcd주고 확인 후 수정 가능

void setup()
{
  lcd.init();  // LCD초기 설정
  lcd.backlight(); // LCD초기 설정
  lcd.setCursor(0,0);

  lcd.setDelayTime(500);
  lcd.printHangul(L"안녕하세요",0,5);
  lcd.printHangul(L"반갑습니다",0,5);
}

void loop()
{// 아무 동작도 안함
}
- 결과
3) LCD에 캐릭터 나타내기
#include <LiquidCrystal_I2C.h>

LiquidCrystal_I2C lcd(0x27, 16, 2);  // set the LCD address to 0x3F for a 16 chars and 2 line display

// make some custom characters:
byte Heart[8] = {
0b00000,
0b01010,
0b11111,
0b11111,
0b01110,
0b00100,
0b00000,
0b00000
};

byte Bell[8] = {
0b00100,
0b01110,
0b01110,
0b01110,
0b11111,
0b00000,
0b00100,
0b00000
};


byte Alien[8] = {
0b11111,
0b10101,
0b11111,
0b11111,
0b01110,
0b01010,
0b11011,
0b00000
};

byte Check[8] = {
0b00000,
0b00001,
0b00011,
0b10110,
0b11100,
0b01000,
0b00000,
0b00000
};

byte Speaker[8] = {
0b00001,
0b00011,
0b01111,
0b01111,
0b01111,
0b00011,
0b00001,
0b00000
};


byte Sound[8] = {
0b00001,
0b00011,
0b00101,
0b01001,
0b01001,
0b01011,
0b11011,
0b11000
};


byte Skull[8] = {
0b00000,
0b01110,
0b10101,
0b11011,
0b01110,
0b01110,
0b00000,
0b00000
};

byte Lock[8] = {
0b01110,
0b10001,
0b10001,
0b11111,
0b11011,
0b11011,
0b11111,
0b00000
};

void setup()
{
  lcd.init();
  // Make sure backlight is on
  lcd.backlight();

  // create a new characters
  lcd.createChar(0, Heart);
  lcd.createChar(1, Bell);
  lcd.createChar(2, Alien);
  lcd.createChar(3, Check);
  lcd.createChar(4, Speaker);
  lcd.createChar(5, Sound);
  lcd.createChar(6, Skull);
  lcd.createChar(7, Lock);

  // Clears the LCD screen
  lcd.clear();

  // Print a message to the lcd.
  lcd.print("Custom Character");
}

// Print All the custom characters
void loop()
{
  lcd.setCursor(0, 1);
  lcd.write(0);

  lcd.setCursor(2, 1);
  lcd.write(1);

  lcd.setCursor(4, 1);
  lcd.write(2);

  lcd.setCursor(6, 1);
  lcd.write(3);

  lcd.setCursor(8, 1);
  lcd.write(4);

  lcd.setCursor(10, 1);
  lcd.write(5);

  lcd.setCursor(12, 1);
  lcd.write(6);

  lcd.setCursor(14, 1);
  lcd.write(7);
}
참고사이트 : https://lastminuteengineers.com/i2c-lcd-arduino-tutorial/
In-Depth: Interfacing an I2C LCD with Arduino
Learn to control I2C LCD with Arduino along with pinout, wiring, finding I2C address, adjusting contrast, arduino code, create and display custom characters
lastminuteengineers.com
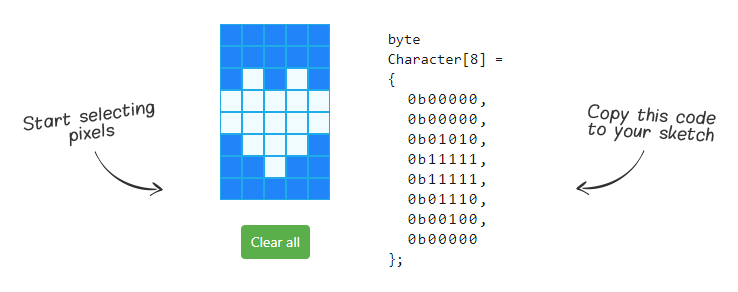
- 위의 사이트에서 캐릭터를 그려 코드를 복사하여 아두이노 스케치 코드에 복사할 수 있다.
'피지컬컴퓨팅 > 아두이노' 카테고리의 다른 글
| 센서 활용하기-조도센서, 물높이 센서, 기울기 센서 등 (0) | 2024.03.25 |
|---|---|
| I2C LCD 활용하기(센서 측정 값 나타내기-초음파센서, 온습도 센서) (0) | 2024.03.21 |
| 사운드 센서(소리감지센서)를 이용한 LED제어하기 (0) | 2024.03.21 |
| 저항없이 버튼사용하기(아두이노 버튼 피아노 만들기) (0) | 2024.03.18 |
| 틴커캐드(Thinkercad)로 회로 시뮬레이션하기 (0) | 2024.03.17 |


