
반응형
LCD에 센서의 값을 나타내는 방법을 알아보겠습니다.
준비물
- 아두이노 우노
- 브레드 보드
- 점퍼선
- I2C LCD
- 각종 센서 : 초음파센서, 온습도 센서, 물높이 센서, 조도센서 등
1) LCD에 초음파센서 거리 측정값 나타내기
회로도

소스코드
#include <Wire.h>                     // i2C 통신을 위한 라이브러리
#include <LiquidCrystal_I2C.h>        // LCD I2C용 라이브러리
LiquidCrystal_I2C lcd(0x27,16,2);     //  0x3F or 0x27
//고유주소가 LCD마다 다르기 때문입니다.

#define trigPin 5  // 초음파 발신핀
#define echoPin 6  // 초음파 수신핀

long duration, distance;

void setup()
{
  pinMode(trigPin,OUTPUT);   // trig를 출력 모드로 설정
  pinMode(echoPin,INPUT);    // echo를 입력모드로 설정

  Serial.begin(9600);        //시리얼 프린트 시작
  lcd.init();                // LCD 초기화
  lcd.backlight();           // 백라이트 켜기
}

void loop()
{
  //초음파 센서를 한번 초기화 하는 과정
  digitalWrite(trigPin, LOW);
  digitalWrite(echoPin, LOW);
  delayMicroseconds(2);
  digitalWrite(trigPin, HIGH);
  delayMicroseconds(10);
  digitalWrite(trigPin, LOW);

  duration = pulseIn(echoPin, HIGH);
  distance= ((float)(340*duration)/10000)/2;  //거리가 cm로 계산

  Serial.print("Distance :");
  Serial.print(distance);
  Serial.println("cm");

  lcd.print("Distance ");
  lcd.setCursor(0,1);
  lcd.print(distance);
  lcd.print(" cm");
  delay(1000);
  lcd.clear();
}
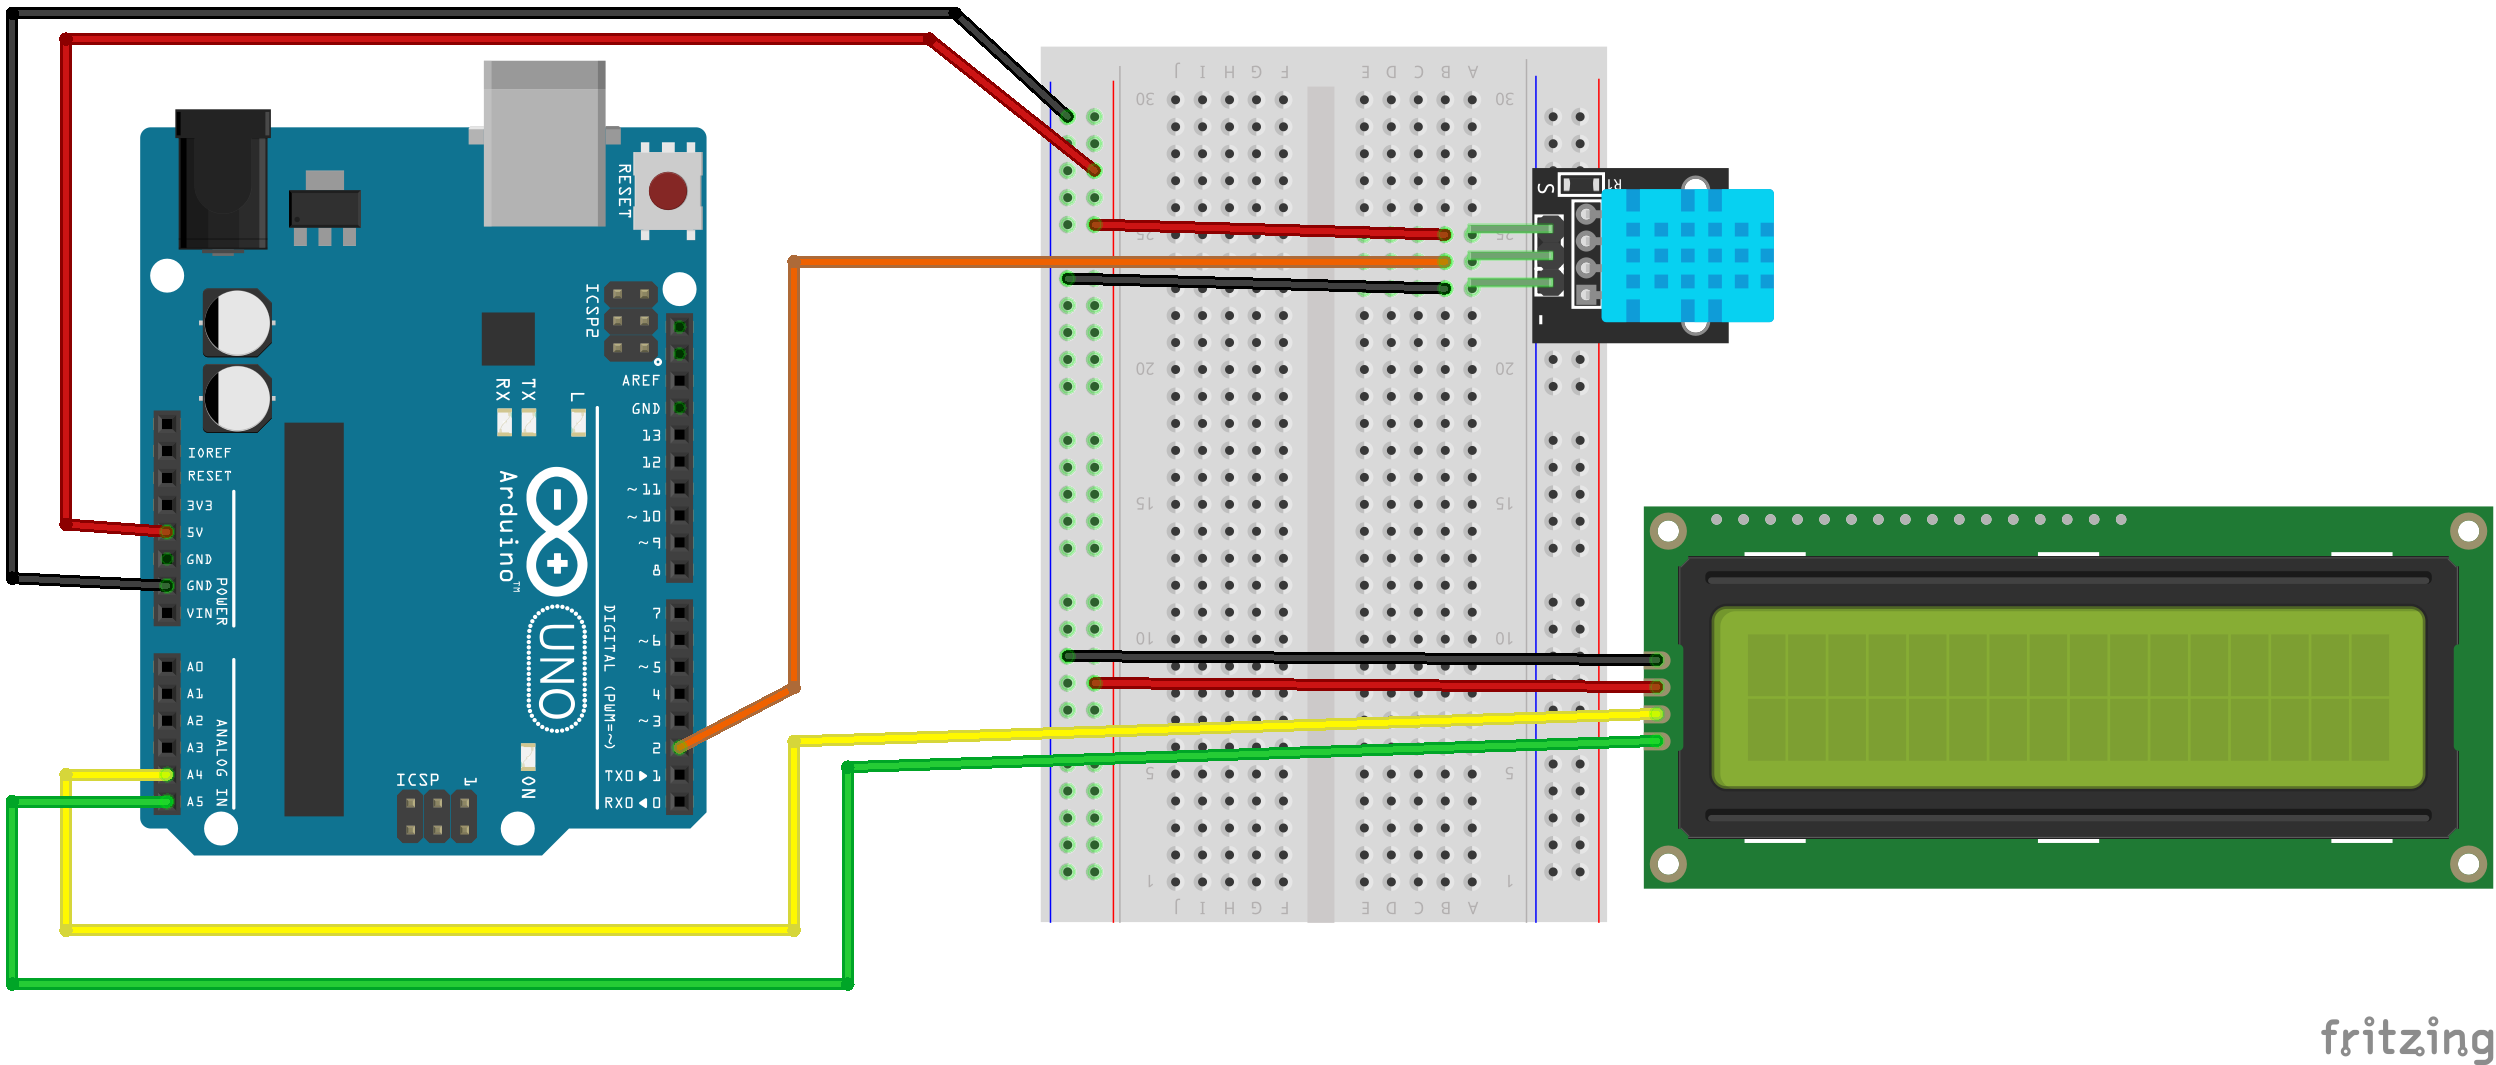
2) LCD에 온습도센서 측정값 나타내기
- 온습도 센서(DHT11)는 온도와 습도를 측정하는 센서로 라이브러리를 추가해야 사용가능합니다.
- 정격 전압 : +5 V (3.5V~5.5VDC)
- 온도 범위 : 0-50 °C ± 2 °C
- 습도 범위 : 20-90% RH ± 5%
회로도
소스코드
- 온습도 센서(DHT11)는 온도와 습도를 측정하는 센서로 라이브러리를 추가해야 사용가능합니다.

- 아두이노 IDE의 툴-> 라이브러리 관리
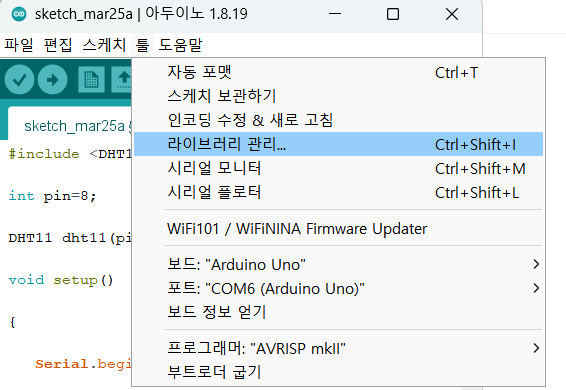
- DHT11 검색하여 라이브러리를 설치한다.
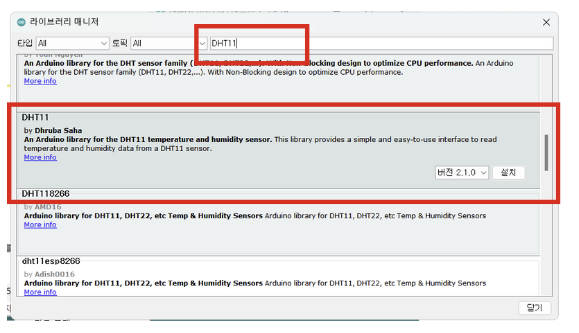
- 예제 파일에서 DHT11의 온도와 습도를 읽는 소스코드를 선택한다.

/**
 * DHT11 Sensor Reader
 * This sketch reads temperature and humidity data from the DHT11 sensor and prints the values to the serial port.
 * It also handles potential error states that might occur during reading.
 *
 * Author: Dhruba Saha
 * Version: 2.1.0
 * License: MIT
 */

// Include the DHT11 library for interfacing with the sensor.
#include <DHT11.h>

// Create an instance of the DHT11 class.
// - For Arduino: Connect the sensor to Digital I/O Pin 2.
// - For ESP32: Connect the sensor to pin GPIO2 or P2.
// - For ESP8266: Connect the sensor to GPIO2 or D4.
DHT11 dht11(2);

void setup() {
    // Initialize serial communication to allow debugging and data readout.
    // Using a baud rate of 9600 bps.
    Serial.begin(9600);

    // Uncomment the line below to set a custom delay between sensor readings (in milliseconds).
    // dht11.setDelay(500); // Set this to the desired delay. Default is 500ms.
}

void loop() {
    int temperature = 0;
    int humidity = 0;

    // Attempt to read the temperature and humidity values from the DHT11 sensor.
    int result = dht11.readTemperatureHumidity(temperature, humidity);

    // Check the results of the readings.
    // If the reading is successful, print the temperature and humidity values.
    // If there are errors, print the appropriate error messages.
    if (result == 0) {
        Serial.print("Temperature: ");
        Serial.print(temperature);
        Serial.print(" °C\tHumidity: ");
        Serial.print(humidity);
        Serial.println(" %");
    } else {
        // Print error message based on the error code.
        Serial.println(DHT11::getErrorString(result));
    }
}
- 시리얼 모니터에 온도 습도 결과가 출력됩니다.
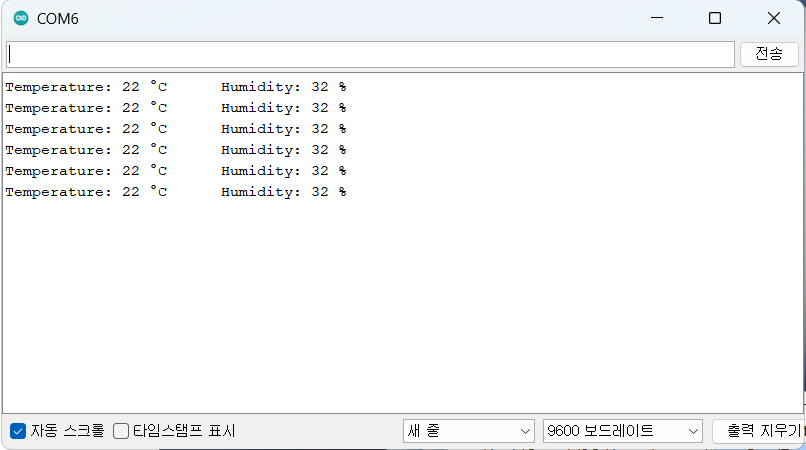
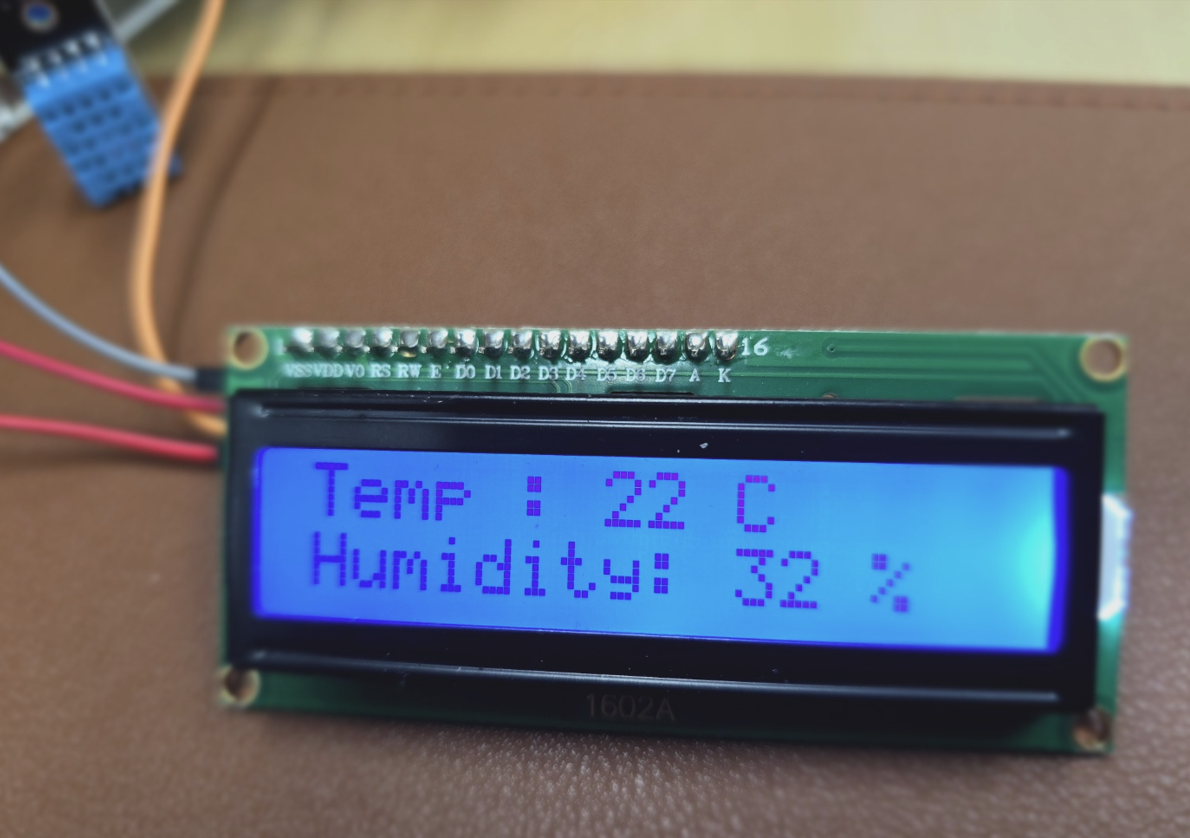
이제 온도 습도 측정값을 LCD에 출력해 보겠습니다.
// Include the DHT11 library for interfacing with the sensor.
#include <DHT11.h>
#include <Wire.h>                     // i2C 통신을 위한 라이브러리
#include <LiquidCrystal_I2C.h>        // LCD I2C용 라이브러리
LiquidCrystal_I2C lcd(0x27,16,2);

// Create an instance of the DHT11 class.
// - For Arduino: Connect the sensor to Digital I/O Pin 2.
DHT11 dht11(2);

void setup() {
  Serial.begin(9600);
  lcd.init();                // LCD 초기화
  lcd.backlight();           // 백라이트 켜기
}

void loop() {
    int temperature = 0;
    int humidity = 0;

    // Attempt to read the temperature and humidity values from the DHT11 sensor.
    int result = dht11.readTemperatureHumidity(temperature, humidity);

    // Check the results of the readings.
    // If the reading is successful, print the temperature and humidity values.
    if (result == 0) {
        Serial.print("Temperature: ");
        Serial.print(temperature);
        Serial.print(" °C\tHumidity: ");
        Serial.print(humidity);
        Serial.println(" %");

        lcd.backlight();
        lcd.display();
        lcd.print("Temp : ");
        lcd.print(temperature);
        lcd.print(" C");
        lcd.setCursor(0,1);
        lcd.print("Humidity: ");
        lcd.print(humidity);
        lcd.print(" %");
        delay(5000);
        lcd.clear();
    } else {
        // Print error message based on the error code.
        Serial.println(DHT11::getErrorString(result));
    }
}
[실행 결과]
반응형
'피지컬컴퓨팅 > 아두이노' 카테고리의 다른 글
| FND 4 digit 7 segment 활용하기 (0) | 2024.03.26 |
|---|---|
| 센서 활용하기-조도센서, 물높이 센서, 기울기 센서 등 (0) | 2024.03.25 |
| I2C LCD 활용하기 (0) | 2024.03.21 |
| 사운드 센서(소리감지센서)를 이용한 LED제어하기 (0) | 2024.03.21 |
| 저항없이 버튼사용하기(아두이노 버튼 피아노 만들기) (0) | 2024.03.18 |


